If you are staring at shiny, dated brass fixtures and wondering how to bring your bathroom or kitchen into the current decade without spending a fortune, you are not alone. The “1980s Gold” regret is a common pain point for homeowners and renters alike. The good news is that you can achieve a high-end designer look for a fraction of the cost with a “Micro-Renovation.” Learning how to DIY update brass fixtures is the single highest-ROI upgrade you can perform for under $20, mimicking the look of $500 hardware for pennies on the dollar.
While many competitors suggest simply grabbing a can of spray paint and hoping for the best, a lasting transformation requires understanding the science of non-ferrous metals. Polished brass is non-porous, meaning paint will slide right off without the correct preparation. In this guide, we will cover the critical technical steps competitors skip—specifically using self-etching primers and the importance of deglossing—and compare the durability of metallic wax versus spray paint for different use cases.
Table of Contents
Understanding the “Micro-Renovation” Value
Replacing a bathroom faucet can cost anywhere from $150 to $400, not to mention the plumber fees if you aren’t handy with plumbing. When you multiply that by a bathroom, a kitchen, and ceiling lights, the cost of modernizing a home quickly spirals into the thousands.
The “Micro-Renovation” approach focuses on high-impact surface updates. By keeping your existing hardware—which is often high quality mechanically—and changing only the finish, you save massive amounts of money. This is particularly valuable when considering renter friendly home improvements that won’t break your lease.
Whether you want to achieve a matte black brass conversion for a modern farmhouse vibe or switch to oil rubbed bronze for a classic look, the process relies on surface adhesion. If you have tried this before and failed, it is likely because you skipped the step of abrading the glossy surface.
The Two Paths: Rub ‘n Buff vs. Spray Paint
Not all fixtures are created equal, and neither are the methods used to paint them. Choosing the right medium is the difference between a finish that lasts five years and one that chips after a week.
Durability Comparison
| Method | Best For | Durability Level | Difficulty | Finish Quality |
|---|---|---|---|---|
| Spray Paint | Faucets, door knobs, cabinet pulls, hinges | High (with primer) | Medium | Solid, opaque look |
| Rub ‘n Buff | Light fixtures, vent covers, rarely touched items | Medium (Low on high-touch) | Low | Metallic, translucent, patina look |
Rub ‘n Buff is a metallic wax paste. It is excellent for items that don’t get touched frequently, like a chandelier or overhead fan. It allows the underlying texture to show through, creating a realistic faux-metal finish. However, because it is a wax, it can rub off if touched aggressively with wet hands.
Spray Paint (specifically automotive-grade or enamel designed for metal) is the only choice for faucets and cabinetry hardware. If you plan to paint cabinet hardware that gets daily use, you must use the spray method combined with a self-etching primer.
Essential Prep: The Critical Steps for Durability
This is where most tutorials fail. You cannot simply clean brass and paint it. Brass is polished to a mirror shine, making it extremely smooth. Paint needs “teeth” to grab onto.
1. Determining Metal Type
First, check if your fixture is solid brass or brass-plated. Place a strong magnet against it. If the magnet sticks, it is plated steel or zinc. If it doesn’t stick, it is likely solid brass. Both can be painted, but solid brass is more durable and less prone to chipping.
2. Deglossing (The Step Most People Skip)
You must remove the glossy finish. We recommend using scuff pads (like the green side of a sponge or a red Scotch-Brite pad) or fine-grit sandpaper (220-grit).
- Pro Tip: Do not use coarse sandpaper (under 100-grit). You want to dull the shine, not create deep scratches that will show under the paint.
3. Cleaning
After sanding, the fixture will be covered in microscopic dust. Wipe it down with a degreaser like mineral spirits or denatured alcohol. Avoid water-based cleaners like Windex, as they can leave a residue that prevents primer adhesion. This step answers the common question of how to clean brass before painting.
4. The Primer Secret: Self-Etching
Standard spray primers will eventually peel off smooth brass. You must use a self-etching primer.
- Science bit: Self-etching primers contain an acid that chemically micro-etches the metal surface, creating a mechanical bond that standard primers cannot achieve. Look for labels specifically mentioning “Self-Etching” or “For Non-Ferrous Metals.”
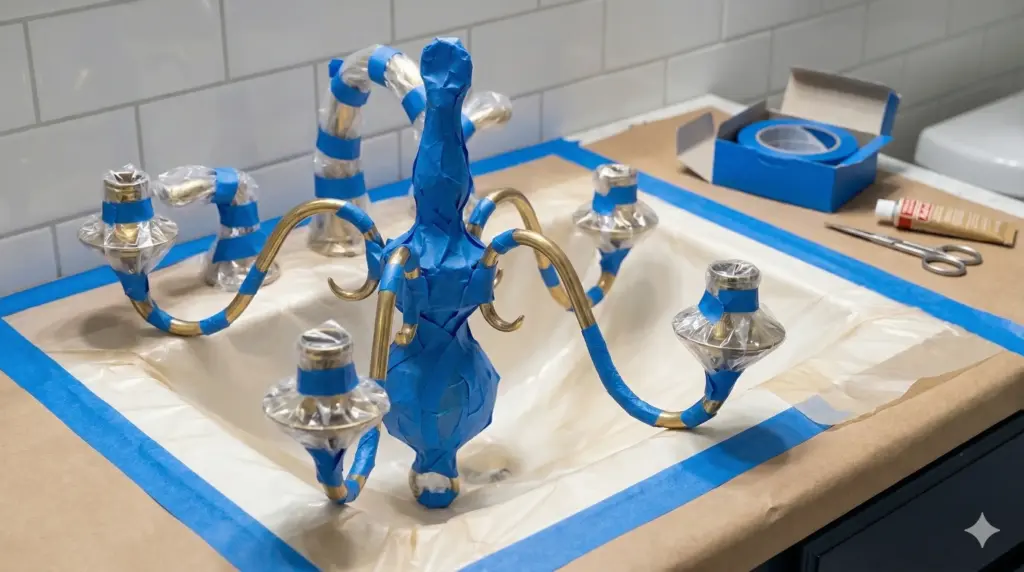
Method 1: Spray Painting for High-Touch Areas
This method is ideal for how to spray paint door hinges, cabinet pulls, and faucets. It creates a hard shell that withstands cleaning.
Supplies Needed:
- Self-etching spray primer (gray or red)
- High-quality spray paint (Satin/Matte Black, Oil Rubbed Bronze, or Champagne Gold)
- Acrylic clear coat (water-based, matte finish)
- ScotchBlue painter’s tape
- Ziploc bags or plastic sheeting
Steps:
- Disassemble: If possible, unscrew the knobs or hinges. It is much easier to paint 30 screws spread out on a cardboard box than to paint a tiny screw while attached to a door.
- Prime: Apply 2-3 light coats of self-etching primer. Wait 10 minutes between coats. Do not spray it on so thick that it drips—”light coats” is the golden rule.
- Paint: Once the primer is dry to the touch (usually 15-20 minutes), apply your color coat. Use sweeping motions starting and stopping off the object to avoid “orange peel” texture. Apply 3 light coats.
- Clear Coat: This is essential for faucets. Apply a water-based matte clear coat to protect the paint from water and cleaning chemicals. Oil-based clear coats can yellow over time; stick to water-based.
Method 2: Rub ‘n Buff for Lighting & Detail
This is the secret weapon for rub n buff bathroom fixtures (like overhead lights) where removing the fixture is difficult or impossible.
Supplies Needed:
- Rub ‘n Buff tube (color: Gilded Silver, European Gold, or Ebony)
- Soft cloth or disposable gloves
- Small stencil brush
Steps:
- Clean and Dry: Ensure the fixture is completely dust-free. You do not need to sand as aggressively for Rub ‘n Buff, but a quick wipe with a deglosser helps.
- Apply: Squeeze a pea-sized amount onto your finger or a soft cloth. Rub it onto the fixture in a circular motion.
- Remove Excess: Immediately take a dry, clean part of the cloth and buff off the excess. You want a sheer layer of metallic color, not a thick, gummy paste.
- Detail Work: Use a small stencil brush to push the wax into crevices and detailed scrollwork.
- Cure: Let it dry for 24 hours before touching.
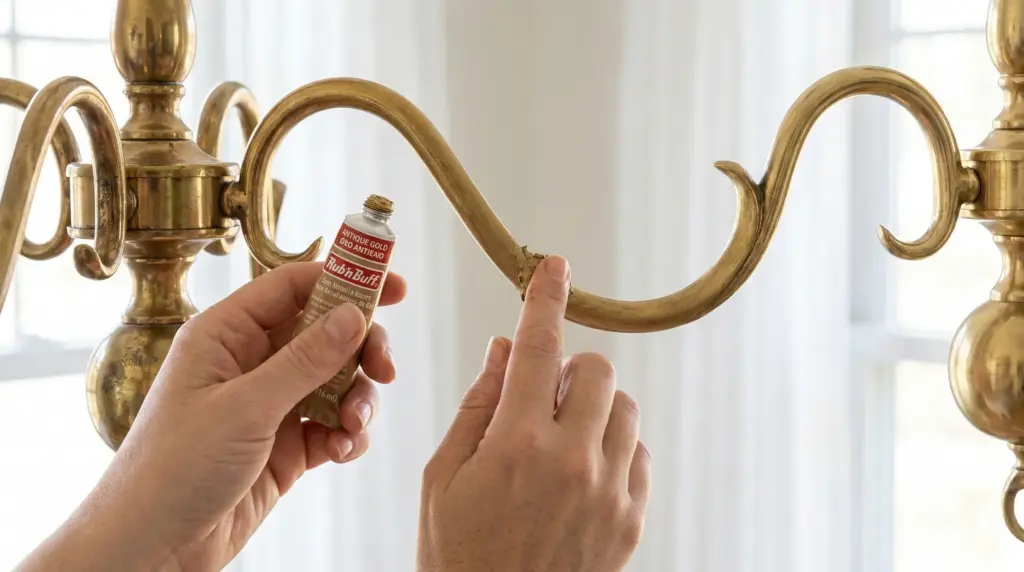
Rub ‘n Buff transforms dated polished brass into an antique gold finish without the mess of spray paint.
How to Paint Faucets Without Detaching Plumbing
One of the most requested tricks is painting brass faucets without removing them. Removing a faucet can be a plumbing nightmare involving penetrating oil and basin wrenches under a tight sink.
- Protect the Sink: Tape off the sink basin completely with heavy-duty paper or plastic. You do not want overspray on your porcelain or granite.
- Bag the Spout: Use a plastic bag and tape it tightly around the base of the faucet spout to protect the internal valves from paint dust.
- Tape the Handle Mechanisms: Use painter’s tape to mask off the handle stops so they can still move, or tape them down if you are painting the handles too.
- The Spray Technique: Because you cannot rotate the faucet, you must move your body. Spray from the top, then the left, then the right. Do not spray upward from the sink basin, or you will get dust on the porcelain.
- Dust Management: Open the window or turn on the bathroom fan. Paint dust will settle everywhere if the air is stagnant.
Properly taping off a faucet allows you to update the look without calling a plumber.
Troubleshooting Common Failures
Even with prep, things can go wrong. Here is how to fix the most common issues.
Problem: The paint feels sticky or tacky after a week.
- Cause: This is usually caused by high humidity or applying the second coat too soon before the solvents in the first coat evaporated.
- Fix: Unfortunately, you usually have to strip it (use acetone or mineral spirits) and start over. In the future, ensure humidity is below 50% and allow 1 hour of dry time between coats.
Problem: The paint is peeling in sheets.
- Cause: You likely didn’t degloss enough or skipped the self-etching primer.
- Fix: Peel the loose paint, sand the edges down to the metal with 220-grit sandpaper, clean with mineral spirits, and reapply self-etching primer.
Problem: Rub ‘n Buff wiped off when I cleaned it.
- Cause: Rub ‘n Buff is a wax, not a hard enamel. Aggressive scrubbing will remove it.
- Fix: Reapply a small amount. For high-traffic areas like faucets, you must use the spray paint method described above.
Renter-Friendly Reversible Options
If your lease prohibits permanent changes, you can still modernize gold hardware.
- The Bag-and-Tape Method: If you want to change brass fixtures to chrome or black temporarily, use painter’s tape and cardstock. While you can’t effectively “tape” a finish that looks like metal, you can use removable vinyl wrap designed for automotive trim. This comes in matte black, chrome, and gold. It adheres well to smooth brass but peels off without residue when you move out.
- Screw Swaps: Sometimes, just swapping the visible screws on a brass plate (using black or nickel screws from the hardware store) makes enough of a difference to neutralize the brass look without painting the fixture itself.
For a comprehensive list of changes you can make that your landlord will approve, check out our guide on renter friendly home improvements. If you are tackling the cabinets as well, don’t miss our detailed tutorial on how to paint cabinet hardware so it actually lasts.
A small budget bathroom renovation relies heavily on updating the finish of standard builder-grade fixtures.
FAQ: DIY Brass Fixture Updates
Can you paint brass bathroom fixtures?
Yes, you absolutely can brass bathroom fixtures. However, because they are exposed to water and humidity, you must use self-etching primer and a protective clear top coat to ensure the paint does not peel.
Does spray paint stick to brass?
Standard spray paint does not stick well to polished brass for long periods; it chips easily. Spray paint will stick permanently if you first degloss the surface with sandpaper and apply a self-etching primer designed for non-ferrous metals.
How do you modernize shiny brass?
You can modernize shiny brass by changing the finish. The most popular modern options are painting it matte black (for a modern/industrial look) or brushed nickel/champagne gold (for a contemporary warm look). Using Rub ‘n Buff in “Gilded Silver” or “European Gold” dulls the shine effectively.
What is Rub n Buff and how do you use it?
Rub ‘n Buff is a metallic wax paste used to give a metallic sheen to surfaces.To use it, squeeze a small amount onto a cloth, rub it onto the fixture in a circular motion, and then immediately buff off the excess with a clean cloth. It dries hard but is less durable than spray paint.
Is it better to spray paint or brush paint hardware?
It is almost always better to spray paint hardware. Brush painting leaves brush strokes and can drip in the intricate details of door handles or faucets. Spray paint provides a smooth, professional, factory-like finish.
How do you prep brass for painting?
To prep brass for painting, you must clean it with a degreaser (like mineral spirits) to remove oils, then scuff the surface with a Scotch-Brite pad or 220-grit sandpaper to remove the glossy shine. A wipe-down with tack cloth immediately before painting ensures no dust remains.
Can you change brass to chrome?
It is difficult to make brass look exactly like shiny chrome with paint because chrome requires a highly reflective, mirror-like base. However, you can achieve a very convincing “brushed nickel” or “satin chrome” look using silver spray paint with a matte finish, or by using automotive chrome spray paint (which is expensive and requires a perfect black base coat).
Ready to transform your home for less? Whether you are aiming for a full budget bathroom renovation or just swapping out some drawer pulls, updating your brass fixtures is the perfect weekend project. Join the Daily Decor Lab newsletter to get more affordable DIY hacks, product recommendations, and room makeovers delivered straight to your inbox every week.