DIY Tiled Coffee Table: Give Old Furniture a Moroccan Makeover
Maya
·10 min read
Transforming a battered coffee table into a bespoke statement piece is the ultimate hack for affordable maximalist decor ideas. If you are craving the intricate textures of Moroccan interior design but your budget screams “big box store,” a DIY tiled coffee table is the perfect solution.
Whether you are a renter needing a temporary upgrade or a homeowner ready for a permanent renovation, tiling a table top allows you to achieve the high-end look of encaustic cement tiles for a fraction of the cost. In this guide, we will walk you through two distinct methods: a renter-friendly peel-and-stick approach and a permanent “forever” method using real mortar. We will also dive into how to mix patterns like a pro and troubleshoot common issues so your new table looks professionally installed.
Before you buy materials, you need to select the path that fits your living situation. Not all tiles are created equal, and the adhesive you choose determines whether your security deposit is safe.
Use this decision matrix to decide if you should tackle a cement tile table makeover or stick to renter friendly furniture hacks.
Feature
The Renter Method (Peel & Stick)
The Forever Method (Mortar)
Removability
High (Uses removable adhesive or gentle prying)
Low (Permanent bond)
Skill Level
Beginner (No wet mess)
Intermediate (Requires mixing)
Durability
Medium (Best for accent tables)
High (Can endure daily abuse)
Aesthetic
Smooth vinyl finish (2D look)
Textured cement/stone (3D look)
Best Surface
Laminate, sealed wood, glass
Raw wood, plywood, concrete
Dry Time
Instant
24–48 hours
If you are unsure about your long-term living situation, start with the peel-and-stick method. Many modern peel and stick tiles for furniture are designed to be removable, making them ideal for apartment dwellers.
The Cost Breakdown: Peel-and-Stick vs. Real Tile
One of the biggest advantages of a budget table refresh is the control you have over costs. While real cement tiles are stunning, they are heavy and expensive. Here is a realistic cost comparison for a standard 40″ x 20″ coffee table.
Materials Cost Estimate
Material
Peel-and-Stick (Renter)
Real Cement Tile (Owner)
Tiles
$30 – $50 (Vinyl decals)
$80 – $150 (Solid cement)
Adhesive
$0 (Backing included)
$15 (Mastic or thin-set)
Grout
N/A
$10 – $20 (Sanded grout)
Sealer
$15 (Clear coat spray)
$25 (Penetrating sealer)
Tools
$10 (Utility knife)
$40 (Trowel, float, spacers)
TOTAL
~$55 – $75
~$170 – $245
Note: Prices vary based on brand and quality. For the best results, look for “thick” peel-and-stick tiles (0.5mm+) that mimic the grout lines of real tile.
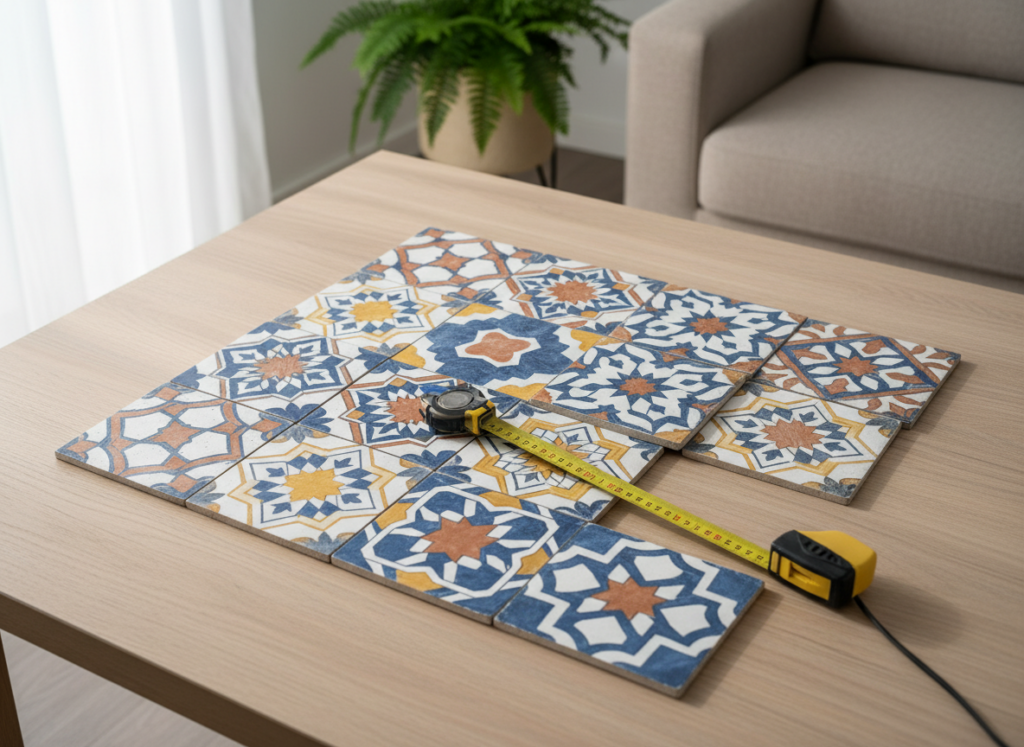
Laying out your tiles before committing to adhesive helps you visualize the final pattern and identify cuts needed.
Aesthetic Prep: Pattern Mixing for the Maximalist Look
The beauty of a DIY tiled coffee table lies in the pattern. Moroccan design is famous for bold geometry, but mixing patterns can be intimidating. If you want to embrace the “more is more” philosophy without creating visual chaos, use this Pattern-Mixing Cheat Sheet.
The Rule of Two
Never use three different competing patterns. Stick to two maximum.
The Dominant Pattern: A large-scale geometric or starburst design.
The Subordinate Pattern: A simple stripe, solid color, or small-scale lattice.
Color Cohesion
Ensure your patterns share at least one color family.
Pairing: Navy & White geometric + Navy & Gold stripe.
Avoiding: Red & Green floral + Blue & Yellow plaid.
When choosing best peel and stick tiles for tables, look for those with a textured finish. While smooth vinyl is easier to clean, a slightly embossed texture catches the light better, mimicking the authentic feel of a DIY zellige tile table tutorial result.
Method 1: The Renter-Friendly Peel-and-Stick Transformation
This method is ideal for how to tile a table-top for beginners because it requires no power tools and no drying time for mortar. It is the fastest route to a high-impact look.
Clear polyurethane sealant (water-based spray or wipe-on)
Step 1: Prep the Surface (Crucial for Renters)
Even if you are using tiling over a laminate table without adhesive mortar, the surface must be pristine. If the table has a glossy finish, the peel-and-stick backing may fail over time.
Clean the table thoroughly with warm water and degreaser to remove oils and wax.
Wipe down with denatured alcohol to remove any remaining residue.
Lightly sand the surface with 220-grit sandpaper just to scuff the gloss (wipe clean after). This gives the adhesive something to grip.
Step 2: Plan Your Layout
Do not peel and stick randomly.
Find the center of your table. Measure the width and length, mark the center points, and draw a light crosshair.
Dry-lay your tiles. Start from the center and work outward to ensure you don’t end up with a tiny sliver of tile on the edges.
If you have awkward gaps at the edges, plan to cut your edge tiles slightly larger to minimize the gap.
Step 3: Application
Peel the backing off the first center tile.
Align it perfectly with your center crosshair lines.
Press firmly starting from the center and moving outward to push air bubbles out.
Use a credit card to smooth the surface firmly.
Repeat for subsequent tiles, butting them up tightly against each other.
Use a credit card to press out air bubbles immediately after applying the tile to ensure a smooth finish.
Step 4: The Edges
For a finished look, you need to deal with the sides.
Option A: Apply “nosing” tiles or metal edge trim.
Option B: Use the same tiles, wrapping them over the edge. This is harder on curved edges but looks great on square tables.
Option C: Paint the sides a contrasting color (like black or gold) to frame the tile top.
Step 5: Seal the Deal
Even “waterproof” vinyl tiles can peel at the seams if water gets under them. Apply 2-3 coats of a water-based clear polyurethane spray. This seals the edges and protects the surface from scratches.
Method 2: The Forever Cement Tile Makeover
If you own your home and want a table that will last for decades, using real cement tiles is the way to go. This method involves grouting a table top and requires a bit more patience.
Tools & Materials Needed:
Cement or ceramic tiles (6×6 or 4×4 recommended)
Modified thin-set mortar (small tub)
Sanded grout (unsanded if using polished stone)
Tile spacers (1/16 inch for a seamless look)
Notched trowel (1/4 inch square notch)
Grout float
Sponge and bucket of water
Mixing paddle and drill (or mix by hand)
Penetrating tile sealer (essential for cement!)
Step 1: Strengthen the Base
Real tile is heavy. If you are tiling over a thin hollow-core door or a weak particleboard table, it may bow.
Reinforce the underside of the table with wood cleats or a layer of 1/4-inch plywood backing if necessary.
Sand the existing surface down to raw wood to create a mechanical bond for the mortar.
Step 2: Apply Mortar (The “Mud”)
Mix your thin-set mortar to the consistency of peanut butter.
Using the notched trowel, spread aLayer of mortar onto the table. Comb it in straight lines.
Important: Only work in a 2×2 foot area at a time so the mortar doesn’t skin over.
Step 3: Set the Tiles
Press your tiles firmly into the mortar.
Place your spacers between the tiles to ensure even grout lines. For a Moroccan interior design look, thinner grout lines usually look more authentic.
Check that the tiles are level. If one tile is sitting higher than its neighbor (lippage), press it down or add a little more mortar underneath.
Step 4: Grouting
Wait 24 hours for the mortar to cure completely before grouting.
Mix your grout. For tables, contrasting grout (like white grout with black tiles) looks striking, while matching grout looks more subtle.
Apply the grout with the float, pushing it into the gaps at a 45-degree angle.
Hold the float at a 45-degree angle to pack the grout deep into the joints for a durable finish.
Step 5: Cleaning and Sealing
Wait about 20 minutes for the grout to firm up slightly, then wash the surface with a damp sponge. Rinse the sponge frequently. Do not use too much water, or you will wash the grout out of the lines.
Let it dry for another 24 hours.
Critical step: Cement tiles are porous. You must apply a high-quality penetrating sealer. Apply 2-3 coats to ensure coffee spills don’t stain your masterpiece.
Troubleshooting Common Tiling Issues
Even experts run into hiccups. Here is how to fix the most common problems so your DIY tiled coffee table comes out perfect.
1. Tile Lippage (Uneven Edges)
Lippage happens when one tile edge is higher than the adjacent one.
Cause: Uneven adhesive application or warping in cheap furniture.
Fix: For peel-and-stick, you can use a very thin piece of cardboard underneath the low tile to shim it up. For mortar, gently tap the high tile with a rubber mallet and a block of wood to lower it, or lift the low tile and add more mortar.
2. Tiles Not Sticking (Peel-and-Stick)
Cause: Residue on the table surface or cold temperature (adhesive hates the cold).
Fix: Ensure the room is above 65°F (18°C). Clean the surface with alcohol again. If a specific tile keeps popping up, use a tiny dab of clear construction adhesive (like Gorilla Glue)—just know it might be harder to remove later.
3. Grout Hazing
A cloudy film on the tiles after grouting.
Fix: This is stubborn grout residue. Let it dry completely, then use a dry cheesecloth or towel to buff it off. If that fails, use a specialized grout haze remover solution.
4. Chipping Edges
Prevention: The edges of a table take the most abuse. Consider painting a border of trim or using metal corner guards to protect the tile corners.
Frequently Asked Questions
Can you put tile directly on a wood table?
Yes, but with caveats. If the wood is raw, the mortar will bond well. If the wood is varnished or painted (like most finished furniture), you must sand it down to the raw wood first to ensure the mortar adheres properly. If you skip sanding, the weight of the tile will eventually pull the finish off the wood.
Do peel and stick tiles work on furniture?
Yes, absolutely. However, you must use high-quality, thick vinyl tiles meant for flooring or heavy-duty backsplashes. Cheap wall stickers will peel up quickly. Preparation is key—the surface must be clean, dry, and degreased. We have used similar techniques successfully in bathrooms, as shown in our guide to 7 Peel-and-Stick Tile Bathroom Ideas That Look Expensive.
How do you waterproof a tiled table top?
Waterproofing is essential for coffee tables to prevent cup rings and spills from damaging the tile or grout. For peel and stick tiles for furniture, use a water-based polycrylic spray sealer. For cement tile table makeovers, apply a penetrating stone sealer to the tile and grout, followed by a coat of topical wax if you want extra shine and protection.
What is the best adhesive for tiling a table?
For the “Forever Method,” a polymer-modified thin-set mortar is the best adhesive. It is stronger than traditional mastic and is water-resistant, which is vital for a piece of furniture that might hold drinks. For renter-friendly projects, the built-in adhesive on premium vinyl tiles is best, supplemented by removable double-sided tape for edge pieces.
Can you tile over a laminate coffee table?
Yes. Tiling over a laminate table without adhesive mortar (i.e., using peel-and-stick) is possible if the laminate is scuffed with sandpaper first to break the slick surface. If using mortar, you must sand the laminate down to the brown particleboard core; otherwise, the mortar will stick to the plastic laminate, not the table, and the entire top will slide off.
Do you need to seal a tiled table top?
If you used real tile and grout, sealing is mandatory. Grout is essentially concrete and is very porous. Unsealed grout will absorb coffee, wine, and food instantly, causing permanent stains. Cement tiles also require sealing to protect the pigment and the porous surface. Vinyl tiles do not strictly need sealing for protection, but a sealant helps prevent the edges from lifting and adds a realistic sheen.
Conclusion: Your New Centerpiece Awaits
A DIY tiled coffee table is more than just a weekend project; it is a way to inject high-end personality into your home without the luxury price tag. Whether you choose the quick gratification of a renter-friendly vinyl update or the timeless durability of a cement tile table makeover, the result will be a one-of-a-kind piece that anchors your living room.
Ready to start? Grab your tiles, clear off that old table, and get to work. You’ll be sipping morning coffee on your new Moroccan masterpiece by Monday morning.
Looking for the perfect tiles or tools to get started? Check out our recommended supplies for peel and stick tiles and tile installation kits to get everything delivered to your door.
Transform your home with 5 thrift store furniture flips under $50. See the exact project math, before & after photos, and how much we saved vs. retail.
Learn how to make your house smell like spring using non-toxic methods. Discover affordable DIY spring simmer pots, essential oil blends, and room sprays.